Create your virtual network with QEMU
“The best way to learn about computer networks is to get the hands dirty with a real one.” Mickey Mouse
Network vs Virtual Network
The normal (not virtual) network is something you probably already know ( the internet connection you use at home is an example) so I will skip it and start talking about the second one.
As the name itself suggests, a virtual network is something not physically existing. The main difference between a virtual network and a real one is that the first one doesn’t exist physically, it is just the result of something who emulates the behavior of a real network.
There are several kind of virtual networks: VLANs, VPNs, VPLS…most of them allow to gather some machines without respecting their physical location.
In this article I will talk about the kind of virtual network established by virtual devices together with virtual machines.
A network of virtual machines
Nowadays virtual machines are one of the most widely used technologies. Whether you need to have your own web server, but you don’t want to spend much for a dedicated one or you want an isolated environment for your experiments, a virtual machine could be what you need.
The good news is virtual machines can also be used to build a virtual network! Let’s see how to create one using one of the most powerful and widely used emulator: QEMU.
Networking with QEMU
QEMU offers several ways to deal with networking (have a look here), it can forward the ports of the host to the ports of the guest, use sockets to connect different guests, use tap interfaces etc…
In this article I will talk about how to build a virtual network using tap interfaces. Here is an article talking more or less about the same thing, using socket connection between the virtual machines.
If you don’t know much about tap interfaces and/or Linux bridges I strongly suggest you to have a look at some article who talks about that, here there is a list of some interesting references:
From “Blogs by Sriram“
- Understanding Virtual Networks – The Basics
- Linux Bridge and Virtual Networking
- Tap Interfaces and Linux Bridge
The kernel documentation
From backreference.org
“Le site du Zero” an extremely useful learning resource (french)
Learn more about virtual devices
Our virtual network
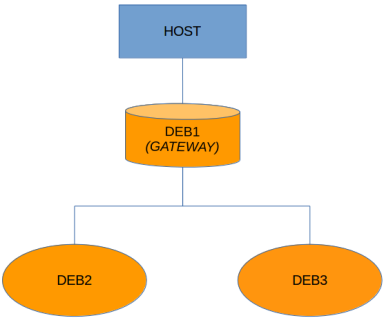
This is how it will look like the virtual network we are going to build:
It connects three virtual machines: deb1, deb2, deb3 and uses deb1 as gateway to the host machine who provides a connection to the internet.
Then, let’s see how to build it…
First of all we need to have three disk images to work with. I’m not going to detail this part, you can easily find many articles on the web about how to create a bootable image with QEMU. For this article I will be using a small debian image for all of the guests.
Now that we have the guests images we need to connect them to each other. For this we will use a Linux bridge (which will act as a layer 2 switch) and three tap interfaces, one for each machine, attached to the Linux bridge (like ports in a switch).
As we will need to create those interfaces every time we want to start our machines it will be nice to have a script who does so. Same thing for when the network will stop to exist, we need a script that removes/brings down all the interfaces we are no longer using. This is exactly the purpose of /etc/qemu-ifup and /etc/qemu-ifdown.
You can directly modify/create those scripts in your /etc directory but if you are planning to use QEMU with different network configurations I find more practical to create two new ifup and ifdown scripts in a dedicated directory.
The scripts /etc/qemu-ifup and /etc/qemu-ifdown are usually executed by QEMU every time a new instance using a tap interface is launched (ifup) or terminated (ifdown). This requires giving to QEMU a bit more privileges than usual.
As I want QEMU to be invoked without any particular privilege I will use a script that will be executed with higher privileges and then I will execute QEMU with “normal” privileges (this is more ore less the same principle behind QEMU’s network helper).
I also want to keep everything as simple as possible so, instead of executing ifup (or ifdown) every time a machine of my network goes up (or down) I will use a single script to bring up all the machines and another one to bring the interfaces down once I’m finished (same as in here).
NOTE: This technique is not the one QEMU uses by default but it works well for our small network. It could not be the best way for bigger networks (or different purposes from the one of this article) as it will bring up/down all the interfaces at once in a loosened way from the instances of QEMU and this could be source of errors.
The script ifup/ifdown
ifup
We can create a new tap interface using tunctl: tunctl -u <user> -t <interface name>
We need a tap interface for each of our machines, then we will need three different tap interfaces, I will name them: ktap1, ktap2, ktap3.
After the creation we need to bring up each interface, we can do that using the command ip: ip link set <interface name> up Each tap interface needs to be attached to our bridge. First of all we need to create the bridge: brctl addbr <bridge name>. Then attach the interfaces: brctl addif <bridge name> <interface name> and finally bring up the bridge: ip link set <bridge name> up.
Here is the complete version of our script ifup:
1
2
3
4
5
6
7
8
9
10
11
12
13
14
15
16
17
18
19
20
21
22
#!/bin/sh

set -x

# Create the tap devices
tunctl -u luigi -t ktap1
tunctl -u luigi -t ktap2
tunctl -u luigi -t ktap3

# Bring up the tap devices
ip link set ktap1 up
ip link set ktap2 up
ip link set ktap3 up

# Create the bridge to link the tap devices
brctl addbr kbr0
brctl addif kbr0 ktap1
brctl addif kbr0 ktap2
brctl addif kbr0 ktap3

# Bring up the bridge
ip link set kbr0 up
In some cases it could be useful to assign to the bridge an ip address:
ifconfig kbr0 192.168.2.1 netmask 255.255.255.00 broadcast 192.168.2.255
ifdown
Once we are done with our network simulation we can get rid of all the interfaces we created in the ifup script.
We can bring the bridge down using: ifconfig <bridge name> down
Then we can delete it and the tap interfaces: brctl delbr <bridge name> and: tunctl -d <interface name>
Here is the complete version of our script ifdown:
1
2
3
4
5
6
7
8
9
10
11
12
13
14
15
#!/bin/sh
set -x

# Bring down the bridge
ifconfig kbr0 down


# Delete the bridge
brctl delbr kbr0


# Delete the tap devices
tunctl -d ktap1
tunctl -d ktap2
tunctl -d ktap3
The guests
We have three machines. Two of them (deb2 and deb3) need just a single network interface who has to be linked to the local network (the network of deb1, deb2 and deb3). We will let them having access to that network trough their tap interfaces, we choose ktap2 and ktap3. For every machine we need also to specify that we don’t want QEMU to execute the scripts ifup/ifdown for us (as we will do it separately).
1
2
3
4
5
kvm -m 256 -hda deb2.img -name “DEB2” \
-device e1000,vlan=0,mac=de:ad:be:ef:00:02 -net tap,vlan=0,ifname=ktap2,script=no,downscript=no

kvm -m 256 -hda deb3.img -name “DEB3” \
-device e1000,vlan=0,mac=de:ad:be:ef:00:03 -net tap,vlan=0,ifname=ktap3,script=no,downscript=no
NB: Don’t forget to assign two different MAC addresses or QEMU will assign the same by default.
In our network deb1 plays the role of router. It will be the gateway by default for deb2 and deb3. It needs to have at least two network interfaces: one for the private network of deb1, deb2 and deb3 and the other one for the network between deb1 and the host.
For the first one we will use a tap interface as with the other machines, for the connection between the host and deb1 we can instead just use the user mode networking offered by QEMU.
1
2
3
kvm -m 256 -hda deb1.img -name “DEB1 gateway” \
-device e1000,vlan=0 -net user,name=net1,vlan=0 \
-device e1000,vlan=1,mac=de:ad:be:ef:00:01 -net tap,name=net2,vlan=1,ifname=ktap1,script=no,downscript=no
Attention: User mode networking implement a virtual NATed network that works only with TCP/UDP protocols. Utilities as ping and traceroute will not work trough deb1 and the host.
NOTE: In our network the host works as a redundant second router. The purpose of deb1 is to keep the principal router a virtual machine (this could be useful for weird experiments that we don’t want to do directly with the host). Anyway the network could work without deb1 just attaching a free network interface of the host to the bridge.
Now it’s time to put everything together in a script that will first execute as privileged user the script ifup to create and bring up the bridge and all the interfaces, then launch the three instances of QEMU (our guest: deb1, deb2 and deb3) and, eventually, execute again as privileged user the script ifdown to bring down and delete the virtual devices we have been using.
1
2
3
4
5
6
7
8
9
10
11
12
13
14
15
16
17
18
19
#!/bin/sh

sudo /path/to/ifup.sh

kvm -m 256 -hda deb1.img -name “DEB1 gateway” \
-device e1000,vlan=0 -net user,name=net1,vlan=0 \
-device e1000,vlan=1,mac=de:ad:be:ef:00:01 -net tap,name=net2,vlan=1,ifname=ktap1,script=no,downscript=no &

sleep 5

kvm -m 256 -hda deb2.img -name “DEB2” \
-device e1000,vlan=0,mac=de:ad:be:ef:00:02 -net tap,vlan=0,ifname=ktap2,script=no,downscript=no &

sleep 5

kvm -m 256 -hda deb3.img -name “DEB3” \
-device e1000,vlan=0,mac=de:ad:be:ef:00:03 -net tap,vlan=0,ifname=ktap3,script=no,downscript=no

sudo /path/to/ifdown.sh
Configuring the guest’s interfaces
Now we can execute the script we just wrote and have a look to the network interfaces of the virtual machines.
NOTE: The initial configuration of the network interfaces on your machines could change depending on the images you are using.
Generally deb1 should have a first network interface already up with 10.0.2.15 as IP address, this is the default IP address assigned by QEMU when using the user mode networking. There must be a second interface which should usually be down, you should be able to see it executing the command ifconfig -a or using QEMU’s monitor (press Ctrl-Alt-Shift-2 and type info network). This is the interface attached to the tap device ktap1.
We can configure the file [/etc/network/interfaces] (https://unix.stackexchange.com/questions/128439/good-detailed-explanation-of-etc-network-interfaces-syntax) in order to bring it up and assign a static IP address. We add a stanza for this second interface:
1
2
3
4
5
6
auto eth1
iface eth1 inet static
address 192.168.1.254
netmask 255.255.255.0
network 192.168.1.0
broadcast 192.168.1.255
Deb2 and deb3 only have a single network interface (plus the lo), the one linked to the bridge. This interface is usually already up but it doesn’t have any IP address.
Let’s configure /etc/network/interfaces:
1
2
3
4
5
6
7
8
9
10
# The primary network interface of deb2

allow-hotplug eth0
auto eth0
iface eth0 inet static
address 192.168.1.2
gateway 192.168.1.254
netmask 255.255.255.0
network 192.168.1.0
broadcast 192.168.1.255
We do the same thing with deb3, with a different IP address: 192.168.1.3
NOTE: for the sake of simplicity I’m using static IP addresses for deb2 and deb3, this doesn’t mean we couldn’t set up a DHCP server to dynamically assign the address.
Now let’s try to restart our network and use ping to verify the connection between our machines:
deb2 -> deb3
deb3 -> deb2
the connection between deb2 and deb3 works just fine …. we can check the connection between deb1 (192.168.1.254) and deb2/deb3, if everything is well configured we should get the same result.
But what happens when we try to reach a machine out of our local network ? The network is unreachable. Routing
In order to let deb2 and deb3 reach external networks we need to give them a route by default to a router, in our example deb1. This has already been done in the configuration of the file /etc/network/interfaces. Otherwise it could simply be done by running in both the machines the command: route add default gw 192.168.1.254
NOTE: this solution will not be persistent, have a look here to see a more complete overview of the possible solutions.
Now deb2 and deb3 know that they need to ask deb1 if they want to reach an external network, but deb1 is still not configured to work as a router: it will not forward their request to the host.
Here there is a simple guide on [how to set up a router] (https://how-to.wikia.com/wiki/How_to_set_up_a_NAT_router_on_a_Linux-based_computer).
We need to configure deb1 adding some rule to his iptables:
1
2
3
4
modprobe iptable_nat
echo 1 > /proc/sys/net/ipv4/ip_forward
iptables -t nat -A POSTROUTING -o eth0 -j MASQUERADE
iptables -A FORWARD -i eth1 -j ACCEPT
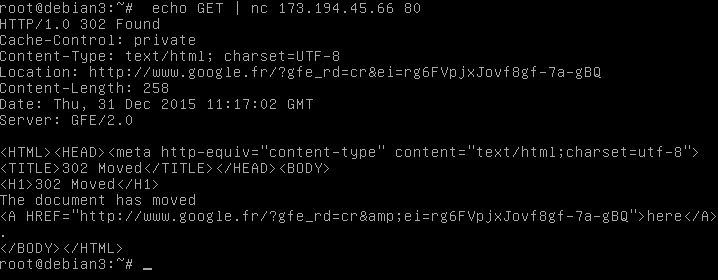
Now let’s see if we can reach the outside work from deb2. As we are using user mode networking to link deb1 to the host we will not be able to use protocols other than TCP or UDP when we want to reach an external network, knowing that let’s use an HTTP request over TCP protocol using netcat:
Everything works perfectly :)


